SEED Standard Required to Learn:
8.2: Energy is stored and transferred in physical systems
Objects can store and transfer energy within systems. Energy can be transferred between objects, which involves changes in the object’s energy. There is a direct relationship between an object’s energy, mass, and velocity. Energy can travel in waves and may be harnessed to transmit information.
Resources for learning about ENERGY |
"Energy"
|
Initial Answer
1. In your science journal, write what you know about energy and about its creation.
2. Instead of creating posters, we will be doing a whole class Initial Answer in Socrative and discuss our collective understanding
2. Instead of creating posters, we will be doing a whole class Initial Answer in Socrative and discuss our collective understanding
"Marbles on the Track" Lab

Safety Requirements:
1. Everyone wears goggles during the lab
2. At no time does anyone throw a marble
3. Keep track of marbles at all times
4. Use the cup to collect/trap marbles so they don't go traveling all over the floor
Materials:
Starting Question:
What causes a marble to move fastest down a track - more mass, more incline, or more distance?
Procedures:
1. As a team, read through all of the instructions.
2. As a team, decide who will do each job.
Jobs:
Materials Manager (gets materials, sets up track configurations, tracks all marbles, returns all materials)
Recorder/Reporter (uses stopwatch to record the time it takes the marble to reach the finish line from the starting line; records initial data - length of track, time marble took to travel; shares data with team members, making sure that all team members have recorded the data in their science journals)
Resource Manager (determines starting and finishing lines, launches and collects marbles)
3. Once you have read all of the instructions and decided who will do each job, send the materials manager over to collect materials.
4. Set up the track as shown below. Position the cup at the bottom of the track so it will catch the marbles as they travel down the track.
5. In your science journals, create a table that captures the following information:
7. Come up with at least 4 different configurations varying the length of the track, and the incline of your track BUT DO NOT VARY BOTH AT THE SAME TIME. You should use the same distance with different variations of inclines and then use the same incline with various distances. So that you can compare the same distance at different inclines and different distances with the same inclines. (EXAMPLE: 50 cm track with 10 cm incline and 20 cm incline; 50 cm, 60 cm track with 10 cm incline.) Use each marble 3 times with each track configuration. Write down data for each time a marble goes down the track.
8. When starting the marbles at the Starting Line, do your best to hold them still and just let them go. You do DO NOT want to put any force on the marble, it is important that you are testing the marbles speed only. Once you have completed the various test runs with your marbles. Have the recorder share the data with everyone. Everyone on the team must have the data recorded in their science journal for the team to achieve a Proficient for the lab.
9. As a team, calculate the speed of each marble run.
10. As a team, discuss which marbles went faster and what might of caused the speed. Write your conclusions in your science journal. You should have at least 2 conclusions and each conclusion should be explained based on observations and data collected. Conclusions MUST be written in sentences. Teams will report their conclusions to the class.
1. Everyone wears goggles during the lab
2. At no time does anyone throw a marble
3. Keep track of marbles at all times
4. Use the cup to collect/trap marbles so they don't go traveling all over the floor
Materials:
- Marbles of various sizes
- Scale to measure mass
- Science journal to create table in and track data
- Pencil
- Stop watch
- Meter stick
- Track
- Cup
- Books
Starting Question:
What causes a marble to move fastest down a track - more mass, more incline, or more distance?
Procedures:
1. As a team, read through all of the instructions.
2. As a team, decide who will do each job.
Jobs:
Materials Manager (gets materials, sets up track configurations, tracks all marbles, returns all materials)
Recorder/Reporter (uses stopwatch to record the time it takes the marble to reach the finish line from the starting line; records initial data - length of track, time marble took to travel; shares data with team members, making sure that all team members have recorded the data in their science journals)
Resource Manager (determines starting and finishing lines, launches and collects marbles)
3. Once you have read all of the instructions and decided who will do each job, send the materials manager over to collect materials.
4. Set up the track as shown below. Position the cup at the bottom of the track so it will catch the marbles as they travel down the track.
5. In your science journals, create a table that captures the following information:
- Mass of the marble - measure the marble in grams
- Distance Traveled (Start line to End line)
- Time Marble took to travel from the starting line (you determine) to the end line (you determine)
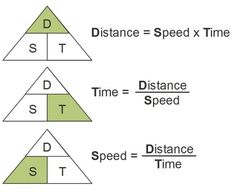
- Speed of the marble - Use the equation for speed in the graphic below
- Use centimeters for length, as a team decide what the speed unit will be
- Incline of Marble - Determine the height of the incline in centimeters.
7. Come up with at least 4 different configurations varying the length of the track, and the incline of your track BUT DO NOT VARY BOTH AT THE SAME TIME. You should use the same distance with different variations of inclines and then use the same incline with various distances. So that you can compare the same distance at different inclines and different distances with the same inclines. (EXAMPLE: 50 cm track with 10 cm incline and 20 cm incline; 50 cm, 60 cm track with 10 cm incline.) Use each marble 3 times with each track configuration. Write down data for each time a marble goes down the track.
8. When starting the marbles at the Starting Line, do your best to hold them still and just let them go. You do DO NOT want to put any force on the marble, it is important that you are testing the marbles speed only. Once you have completed the various test runs with your marbles. Have the recorder share the data with everyone. Everyone on the team must have the data recorded in their science journal for the team to achieve a Proficient for the lab.
9. As a team, calculate the speed of each marble run.
10. As a team, discuss which marbles went faster and what might of caused the speed. Write your conclusions in your science journal. You should have at least 2 conclusions and each conclusion should be explained based on observations and data collected. Conclusions MUST be written in sentences. Teams will report their conclusions to the class.
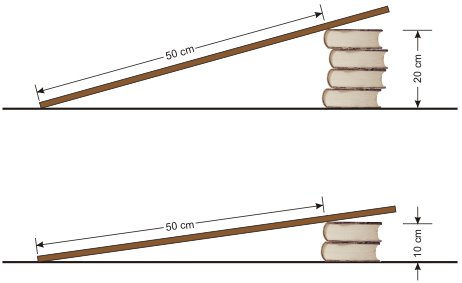
This is an example of what you will do during the lab. Your measurements will most likely be different. REMEMBER that you want to vary the distance and the incline but not both at the same time.
|
|
Textbook Reading
https://eq.uen.org/emedia/file/e5219302-32b9-4c2f-ad65-38f303da6654/1/Grade8RS.pdf
Go to the table of contents:
3 Stand 2: Storing and Transferring Energy parts 3.1, 3.2, 3.3
Go to the table of contents:
3 Stand 2: Storing and Transferring Energy parts 3.1, 3.2, 3.3
Procedures:
1. We will read through the instructions on how to complete this reading together as a class.
2. You will upload the "Student Reading: Energy" file into Notability to take notes, underline, highlight, and circle text.
3. Once everyone on your team has read through the reading - decide which roles team members will have to start the reread - Listener, Talker, or Questioner. Follow the responsibilities/tasks for each role. At the end of each section, switch roles, giving each person a chance at each of the roles.
4. Write down the answers to the questions from the reading instructions in Notability.
5. Write down 3 things you learned from reading with your team today in Notability.
6. Upload your Notability document to Canvas.
| studentreading-energy.pdf |
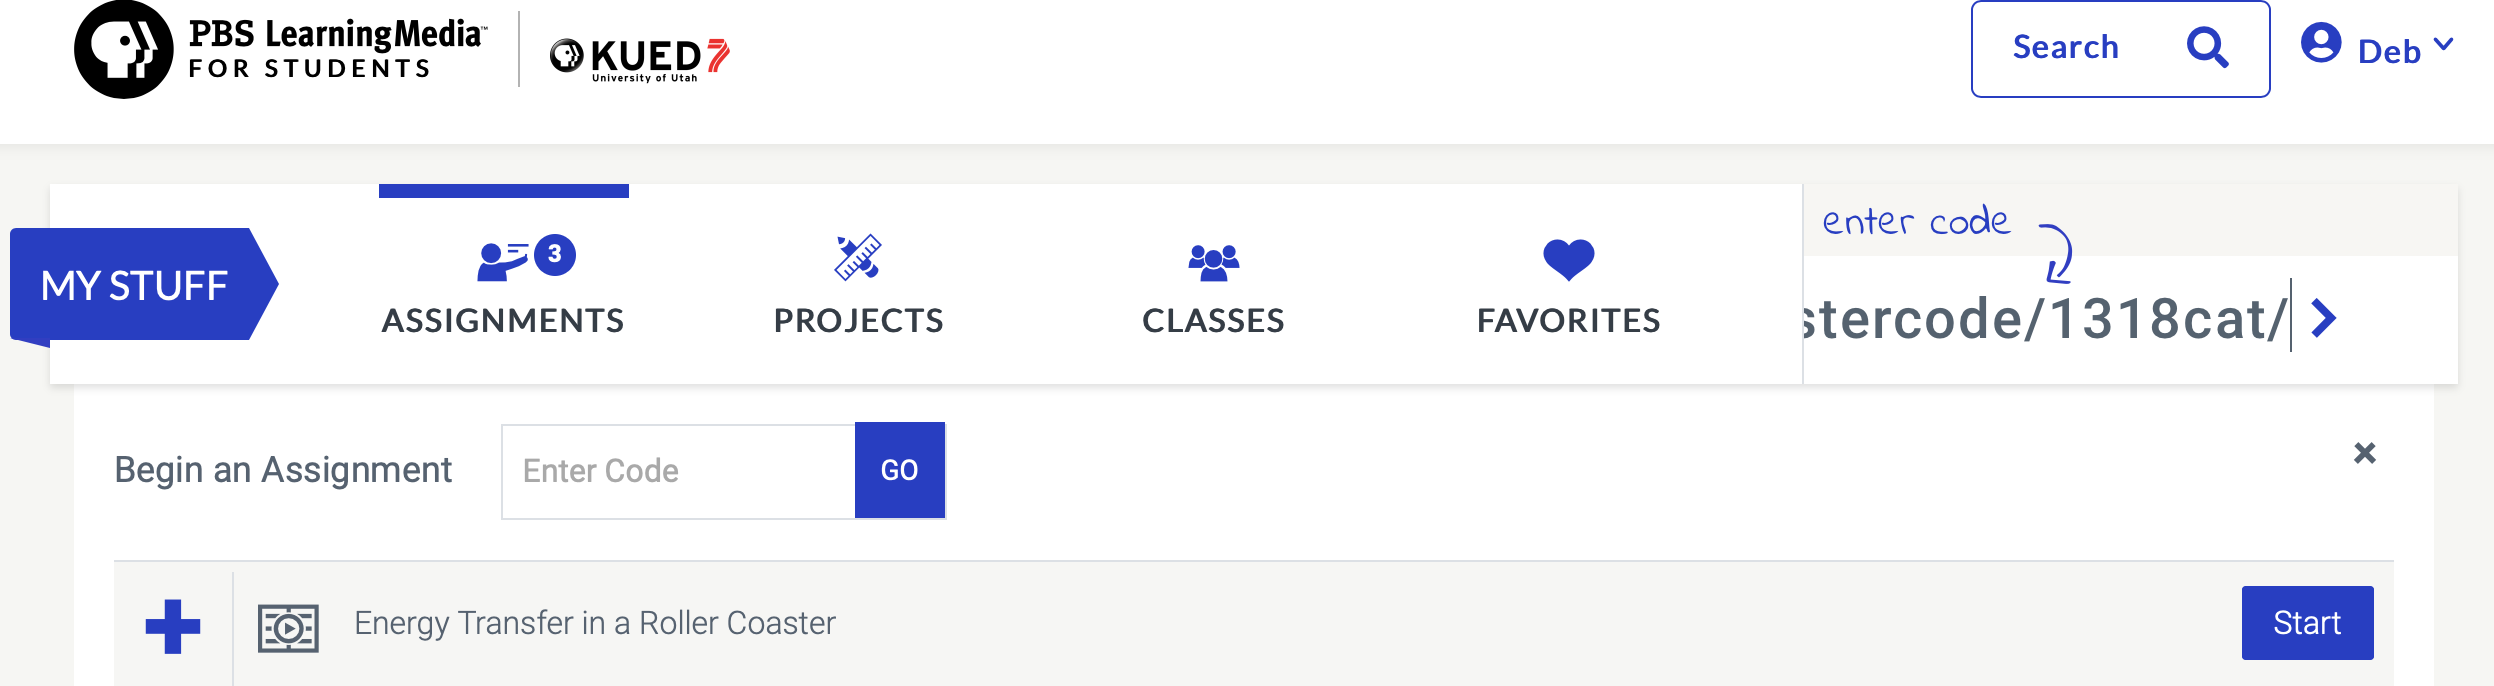
Energy Transfer in a Roller Coaster
Students: Click on this link https://utah.pbslearningmedia.org/student/rostercode/1318cat/ and log-in using your real name. This assignment will be added to PowerSchool. Please be thorough and thoughtful in your answers. Write in complete sentences.
|
STEP 1: Type your first name and last initial. Click Join Class.

|
STEP 2: Click on assignments. Look for "Energy Transfer in a Roller Coaster" and click start.
NOTE: BE SURE TO SAVE EACH PAGE OF YOUR WORK, ESPECIALLY IF YOU DON'T FINISH. IF YOU DON'T FINISH YOU WILL NEED TO COMPLETE IT AS HOMEWORK.
|
Galileo's Experiments - Interactive
Click on this link: www.pbs.org/wgbh/nova/physics/galileo-experiments.html
Complete the interactive, writing information and notes in your science journal as you go. With each experiment, write when the Potential energy was occurring and when the kinetic energy was occurring.
Now go to: https://utah.pbslearningmedia.org/resource/nvel.sci.tech.energyuse/putting-energy-to-use/#.WicB3ih95PYutah.pbslearningmedia.org/resource/nvel.sci.tech.energyuse/putting-energy-to-use/#.WicB3ih95PY
Get some headphones and take good notes.
Marble Lab Take 2

Safety Requirements:
1. Everyone wears goggles during the lab
2. At no time does anyone throw a marble
3. Keep track of marbles at all times
4. Use the cup to collect/trap marbles so they don't go traveling all over the floor
Materials:
Starting Questions:
What causes a marble to move fastest down a track - more mass, more incline, or more distance?
At what point(s) is Potential Energy at work and at what point(s) is Kinetic Energy at work?
Procedures:
1. As a team, read through all of the instructions.
2. As a team, decide who will do each job.
Jobs:
Materials Manager (gets materials, sets up track configurations, tracks all marbles, returns all materials)
Recorder/Reporter (uses stopwatch to record the time it takes the marble to reach the finish line from the starting line; records initial data - length of track, time marble took to travel; shares data with team members, making sure that all team members have recorded the data in their science journals)
Resource Manager (determines starting and finishing lines, launches and collects marbles)
3. Once you have read all of the instructions and decided who will do each job, send the materials manager over to collect materials.
4. Set up the track as shown below. Position the cup at the bottom of the track so it will catch the marbles as they travel down the track.
5. In your science journals, create a table that captures the following information:
7. Come up with at least 4 different configurations varying the length of the track, and the incline of your track BUT DO NOT VARY BOTH AT THE SAME TIME. You should use the same distance with different variations of inclines and then use the same incline with various distances. So that you can compare the same distance at different inclines and different distances with the same inclines. (EXAMPLE: 50 cm track with 10 cm incline and 20 cm incline; 50 cm, 60 cm track with 10 cm incline.) Use each marble 3 times with each track configuration. Write down data for each time a marble goes down the track.
8. When starting the marbles at the Starting Line, do your best to hold them still and just let them go. You do DO NOT want to put any force on the marble, it is important that you are testing the marbles speed only. Once you have completed the various test runs with your marbles. Have the recorder share the data with everyone. Everyone on the team must have the data recorded in their science journal for the team to achieve a Proficient for the lab.
9. As a team, calculate the speed of each marble run.
10. In your science journal, draw one of the track configurations that your team came up with and label the points at which PE (Potential Energy) is at its peak and at what points KE (Kinetic Energy) is at its peak.
11. As a team, discuss which marbles went faster and what might of caused the speed. Write your conclusions in your science journal. You should have at least 2 conclusions and each conclusion should be explained based on observations and data collected. Conclusions MUST be written in sentences. Teams will report their conclusions to the class.
1. Everyone wears goggles during the lab
2. At no time does anyone throw a marble
3. Keep track of marbles at all times
4. Use the cup to collect/trap marbles so they don't go traveling all over the floor
Materials:
- Marbles of various sizes
- Scale to measure mass
- Science journal to create table in and track data
- Pencil
- Stop watch
- Meter stick
- Track
- Cup
- Books
Starting Questions:
What causes a marble to move fastest down a track - more mass, more incline, or more distance?
At what point(s) is Potential Energy at work and at what point(s) is Kinetic Energy at work?
Procedures:
1. As a team, read through all of the instructions.
2. As a team, decide who will do each job.
Jobs:
Materials Manager (gets materials, sets up track configurations, tracks all marbles, returns all materials)
Recorder/Reporter (uses stopwatch to record the time it takes the marble to reach the finish line from the starting line; records initial data - length of track, time marble took to travel; shares data with team members, making sure that all team members have recorded the data in their science journals)
Resource Manager (determines starting and finishing lines, launches and collects marbles)
3. Once you have read all of the instructions and decided who will do each job, send the materials manager over to collect materials.
4. Set up the track as shown below. Position the cup at the bottom of the track so it will catch the marbles as they travel down the track.
5. In your science journals, create a table that captures the following information:
- Mass of the marble - measure the marble in grams
- Distance Traveled (Start line to End line)
- Time Marble took to travel from the starting line (you determine) to the end line (you determine)
- Speed of the marble - Use the equation for speed in the graphic below
- Use centimeters for length, as a team decide what the speed unit will be
- Incline of Marble - Determine the height of the incline in centimeters.
7. Come up with at least 4 different configurations varying the length of the track, and the incline of your track BUT DO NOT VARY BOTH AT THE SAME TIME. You should use the same distance with different variations of inclines and then use the same incline with various distances. So that you can compare the same distance at different inclines and different distances with the same inclines. (EXAMPLE: 50 cm track with 10 cm incline and 20 cm incline; 50 cm, 60 cm track with 10 cm incline.) Use each marble 3 times with each track configuration. Write down data for each time a marble goes down the track.
8. When starting the marbles at the Starting Line, do your best to hold them still and just let them go. You do DO NOT want to put any force on the marble, it is important that you are testing the marbles speed only. Once you have completed the various test runs with your marbles. Have the recorder share the data with everyone. Everyone on the team must have the data recorded in their science journal for the team to achieve a Proficient for the lab.
9. As a team, calculate the speed of each marble run.
10. In your science journal, draw one of the track configurations that your team came up with and label the points at which PE (Potential Energy) is at its peak and at what points KE (Kinetic Energy) is at its peak.
11. As a team, discuss which marbles went faster and what might of caused the speed. Write your conclusions in your science journal. You should have at least 2 conclusions and each conclusion should be explained based on observations and data collected. Conclusions MUST be written in sentences. Teams will report their conclusions to the class.
pHET Simulations Workshop
We will be using pHET Simulations to learn more about energy and how it works. You will be working with a partner today to complete this workshop. You each will take turns either manipulating the simulation or recording the data/findings. To start, both partners will need to download the worksheet below into Notability and go to: http://phet.colorado.edu/en/simulation/energy-forms-and-changes
Procedures:
1. Decide which partner will manipulate the simulation first and who will record the answers in the worksheet. Be sure that you write both partners names on the worksheet. Circle or highlight your name.
2. The partner who is recording the answers will read the instructions to the person manipulating the simulation, the other partner will follow the instructions.
3. Discuss what happens during the manipulation and decide together what the answers should be to the questions. Recorder will fill in the answers.
4. For the next scenario, switch jobs and repeat the process. Once you've completed the entire workshop, you should have the answers to the questions in which you were the recorder on your worksheet, and your partner will have the questions answered on their worksheet from when they were the recorder.
5. Each partner upload the answers from Notability to Canvas.
| energy_forms___changes_simulation_worksheet.pdf |
Bicycle System Lesson
|
1. You will work with a partner for this Lesson, just as you did for the pHET simulations.
2. Upload the document below into Notability. You will need to open a new tab and go to the: Exporatorium site to help you answer questions and fill out the table. 3. As you did with the simulations, take turns recording information/answers. Start with the first section, "Introduction" and work your way through all of the sections. Take turns recording answers and reading/doing the lesson. 4. If you have any questions, ask a team member first before asking Mrs. Smith. Let's work on improving our community/learning environment. 5. Once you have completed the lesson. Upload your completed Bicycle System Lesson from Notability to Canvas. |
| bicycle-system_lesson_1.pdf |
Pendulum Lab
SAFETY PRECAUTIONS: Be sure that there is nothing obstructing the pendulum and that your weights are tied on securely to the string so that the weights do not fly off and hit someone.
CONSIDER THE FOLLOWING:
A pendulum is an object, hung from a fixed point, that swings freely back and forth under the action of gravity. A playground swing is an example of a pendulum. The swing is supported by chains that are attached to fixed points at the top of the swing set. When the swing is raised and released, it will move freely back and forth. These back and forth movements are called oscillations. The swing is moving due to the force of gravity on the swing. The swing continues moving back and forth until friction (between the air and the swing, and between the chains and the attachment points) slows it down and eventually stops it.
MATERIALS:
- String
- Scissors
- Ruler
- Desk or table
- Ring Stand with clip
- Various sized weights
- Stopwatch
- Science journal and pencil
- Scale
BEFORE STARTING LAB:
1. Create a table in your science journal that is 4 columns x 4 rows.
Column Headings: Column 1: Blank; Column 2: Mass #1; Column 3: Mass #2; Column 4: Mass #3
Row Headings: Row 2: Pendulum length 20 cms; Row 3: Pendulum length 40 cms; Row 4 Pendulum length 60 cms
2. Set up the ring stand at the end of the table. Clip on the clip so that when you add the string and the weights they will swing beyond the top of the table.
3. Mass out the three sizes of weights you have been given and record the masses in your science journal. Decide which one will be mass #1, mass #2, and mass #3 in your lab.
4. Read all of the instructions
INSTRUCTIONS:
1. Take the length of string that is 25 cms and tie mass #1 to it. Be sure that when you are finished you still have 20 cms of string to use for your pendulum. Measure 20 cms of string and attach the string with the mass onto the clip so that there is 20 cms of string to use for the pendulum.
2. Have one person take pictures of the lab.
3. Hold the protractor at the top of the clip with one hand, pull the weight on the string to 30 degrees.
4. Have one person get ready to start the stopwatch when the student holding the string/weight lets go. Count to ten complete swings (when the weight returns to the original position equals one swing) of the pendulum. The timer will stop when the pendulum has complete ten (10) swings. Record the number of seconds on the table.
5. Change out the weight and use mass #2. Again be sure that you only have 20 cms of string from the clip to the weight. Repeat steps 1 - 4.
6. Change out the weight and use mass #3. Again be sure that you only have 20 cms of string from the clip to the weight. Repeat steps 1 - 4.
7. Change the length of the string to 35 cms and tie mass #1 to it. Follow steps #1 - 6.
8. Change the length of the string to 45 cms and tie mass #1 to it. Follow steps #1 - 6.
9. Analyze your data table. Write down 4 findings from your data.
10. Using evidence from this lab and your findings write a conclusion of what you have learned using your science words.
Create Your Own Lab
Using one of Galileo's experiments as your templates, test one of the following concepts: mass, density, distance, or speed. Remember the major objective here is understanding the transfer point between PE and KE.
1. You and your team members need to write up your lab. Each person should have the lab written up in the science journals. The write up needs to include the following elements:
3. Do your experiment, keep detailed notes as to what you observe. Take pictures of each step Collect data in your table.
4. Write up 3-4 findings and a conclusion in your science journal. These are not the same things. Findings are major observations, conclusions are based on your findings and are explained using your observations and science concepts.
5. Create an Adobe Spark Video, that both demonstrates your experiment as well as explains what you have learned from doing the experiment. Your video should cover the following:
1. You and your team members need to write up your lab. Each person should have the lab written up in the science journals. The write up needs to include the following elements:
- The question you are testing
- Materials list
- Safety Precautions
- VERY DETAILED Procedure steps
- A list of the data you will be collecting and why
- The table in which you will be collecting your data
- A list of possible outcomes (at least 2)
- List of who will do each task
3. Do your experiment, keep detailed notes as to what you observe. Take pictures of each step Collect data in your table.
4. Write up 3-4 findings and a conclusion in your science journal. These are not the same things. Findings are major observations, conclusions are based on your findings and are explained using your observations and science concepts.
5. Create an Adobe Spark Video, that both demonstrates your experiment as well as explains what you have learned from doing the experiment. Your video should cover the following:
- What is your team's lab question
- Explanation of your lab/research
- What you found out from your lab/research
- How your findings connect to/answer your phenomenon question
- The conclusion based on evidence from your lab
- Covers all outlined information above
- Student has recorded a voice over for each slide explaining the information being presented
- List of credits for images used/Citations for any sources used for research
Quizlet
Vocab Words: (NOTE: With the various types of energy, note in your definitions whether the energy is PE or KE)
Thermal Energy
Mechanical Energy
Nuclear Energy
Chemical Energy
Potential Energy
Kinetic Energy
Gravitational Energy
Elastic Energy
Force
Momentum
Velocity
Speed
Mass
Weight
Density
Chemical reaction
Matter
Thermal Energy
Mechanical Energy
Nuclear Energy
Chemical Energy
Potential Energy
Kinetic Energy
Gravitational Energy
Elastic Energy
Force
Momentum
Velocity
Speed
Mass
Weight
Density
Chemical reaction
Matter
MindMap
Create a MindMap, using all of the information that you have learned throughout the phenomenon. This mind map should follow the rules of a MindMap - no explanations or sentences or paragraphs, but merely demonstration a major concept and the details that describe the concept. As usual this will be the only thing you will be able to use when you answer the phenomenon question. Your MindMap should cover all of the major concepts found in your Quizlet list, which include the science you have learned during this phenomenon.
